
 Homemanager Docs
Child Bridges
Isolate plugins, prevent server crashes, and bypass HomeKit's 150-accessory limit. Step-by-step setup for Homemanager, the web UI, and config.json.
Child Bridges
By default, Homebridge runs all installed plugins inside a single Node.js process. If one plugin hits an unhandled error or loses a cloud connection, the entire server can crash. When that happens, every accessory across your home becomes unresponsive in Apple Home at the same time.
A Child Bridge isolates a plugin into its own operating system process. Homebridge monitors this subprocess independently: if the plugin crashes, Homebridge restarts only that single process. The rest of your smart home stays online without interruption.
Why Child Bridges are useful
- Outage isolation: When a plugin crashes or hangs on a network request, only its own subprocess goes down. All other switches, sensors, and lights remain responsive.
- Faster response times in Apple Home: When you open the Apple Home app, iOS requests the status of all accessories on a bridge simultaneously. On a single shared bridge, a slow cloud plugin delays the response of all other accessories. Apple Home queries child bridges concurrently, allowing local accessories to respond instantly.
- Overcoming the 150-accessory limit: Apple limits each bridge to 149 accessories (150 including the bridge itself). Child bridges split this threshold, because Apple Home treats each isolated plugin as an independent bridge with its own quota.
- Multi-core CPU distribution: Node.js runs on a single thread. Child bridges distribute heavy background tasks like FFmpeg camera transcoding or frequent device polling across multiple processor cores.
- Targeted restarts: Changing a plugin's configuration only requires restarting that specific subprocess, keeping the rest of your home online.
Isolating plugins right when you install them saves the most work. Homemanager automatically prompts you after each download to choose between the main bridge and a child bridge, avoiding the need to reassign rooms in Apple Home later.
Setting up a child bridge
Each child bridge requires its own TCP port and a unique virtual MAC address on your local network, and pairs separately with Apple Home.
Setting up in Homemanager
Homemanager offers two ways to set up a child bridge:
- During plugin installation: When installing an extension from the Integration Store, Homemanager asks how you want to run it right after the download finishes: on the main bridge or as an isolated child bridge. If you choose a child bridge, the app creates a backup first and configures the new bridge automatically.
- From the System tab: You can move existing integrations into child bridges at any time through the bridge manager.
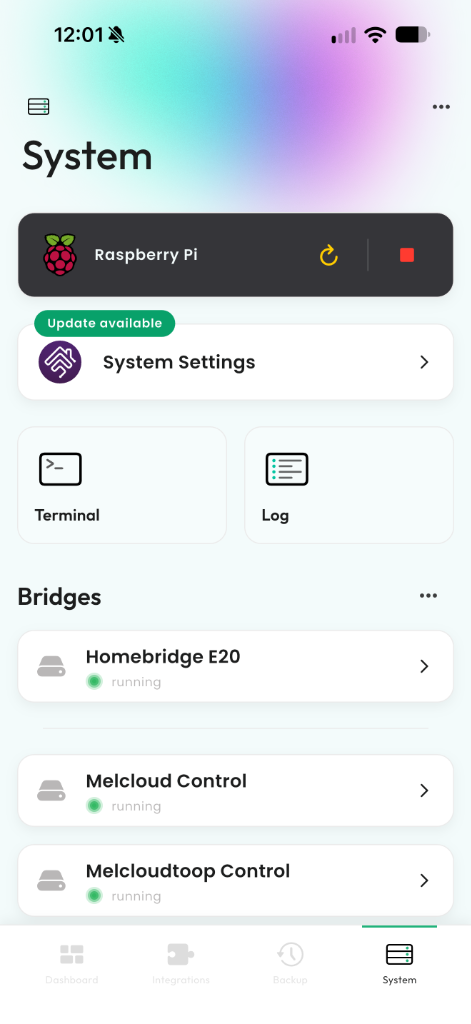
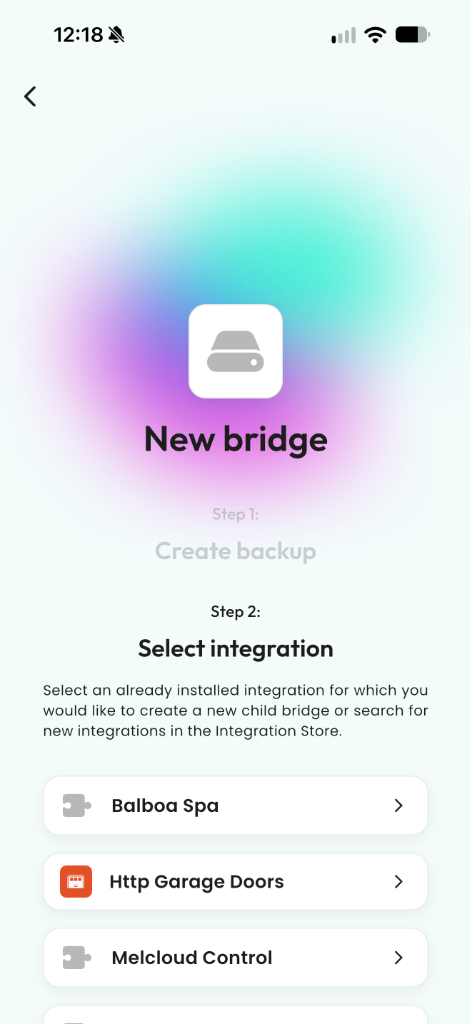
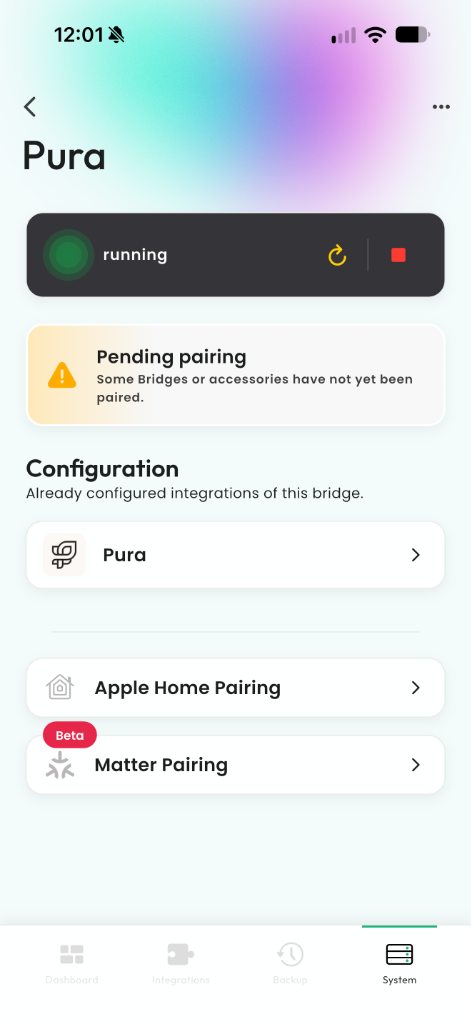
How to isolate an existing integration:
- Open Homemanager and select the System tab. The Bridges section displays your main bridge alongside all running child bridges.
- Tap the three dots in the Bridges section and select New bridge.
- Homemanager automatically creates a backup of your configuration before making any changes.
- Pick the installed integration you want to isolate.
- Once saved, the bridge starts up. A yellow Pending pairing banner indicates that the bridge still needs to be linked to Apple Home.
- Tap Apple Home Pairing to open the QR code and add the bridge to your home. For a complete walkthrough, see the Apple Home pairing guide.
 Download Homemanager for free on the App Store
Setting up in the Web Interface (Config UI X)
- Open the Homebridge web interface in your browser.
- Go to the Plugins tab.
- Click the wrench icon (Settings) on the plugin card.
- Select Bridge Settings.
- Enable the toggle for Run as Child Bridge and click Save.
- Once the process restarts, a new bridge tile appears on your dashboard.
- Click the bridge icon to reveal its QR code, then scan it using the Apple Home app.
Manual configuration in config.json
If you run Homebridge without a graphical interface, configure the child bridge directly in config.json. Add a _bridge object inside the corresponding entry in the platforms or accessories array:
{
  "platforms": [
    {
      "platform": "Shelly",
      "name": "Shelly",
      "_bridge": {
        "username": "0E:8A:2B:3C:4D:5E",
        "port": 51830,
        "name": "Shelly Bridge"
      }
    }
  ]
}- username: A unique, custom MAC address in
XX:XX:XX:XX:XX:XXformat. It must not match any other bridge on your network. - port: An unused TCP port for communication with Apple Home.
- name: An optional display name for the bridge in Apple Home.
Restart Homebridge after saving. The pairing PIN matches your primary bridge PIN from the bridge.pin field in your config.json.
What happens when converting existing plugins
Impact on rooms, scenes, and automations:
When you convert an already paired plugin into a child bridge, Apple Home treats its accessories as new hardware.
Room assignments, custom device names, favorites, and any automations or scenes tied to those accessories will be lost and need to be configured again.
Managing child bridges in daily operation
- Status and controls: A green status indicator in Homemanager shows that the process is running. Use the Restart and Stop buttons to manage that specific process without touching the rest of your server.
- Pending pairing: This notice appears when a child bridge is running on the server but has not yet been linked to Apple Home. Accessories from that plugin only appear in your home once the pairing code has been scanned.
- Memory consumption: Each child bridge runs as an independent Node.js process using approximately 20 to 30 MB of RAM. Keep overall memory limits in mind on low-RAM hardware such as older Raspberry Pi models.
- Network and ports: Every child bridge listens on its own dedicated TCP port. If you run Homebridge inside Docker, use host network mode (
--net=host) so the container exposes new child bridge ports without manual port forwarding. If accessories fail to connect, adjusting the mDNS advertiser can help resolve discovery issues, as detailed in our troubleshooting guide for 'No Response'.
Related guides
Pairing with Apple Home
Step-by-step instructions for pairing primary and child bridges with your Apple Home.
Fixing 'No Response' Errors
Diagnose and resolve connection drops and unreachable accessories in Apple Home.
Resolving Startup Errors
Troubleshoot crashes, port collisions, and boot loops using your server logs.
Homebridge Wiki: Child Bridges
Official child bridge documentation maintained by the Homebridge developer team on GitHub.
Finding & Setting Up Plugins
How to choose stable Homebridge plugins: Verified badges, Node.js compatibility checks, and step-by-step installation with Homemanager, Web UI, and CLI.
Updating System Software
How to safely update Homebridge Core, Homebridge UI, Node.js LTS, and plugins: Step-by-step instructions for Homemanager, the web interface, and the terminal.