
 Homemanager Docs
Raspberry Pi
Set up Homebridge on a Raspberry Pi step by step: From choosing the right hardware to flashing the image and connecting in your home network.
Install Homebridge on a Raspberry Pi
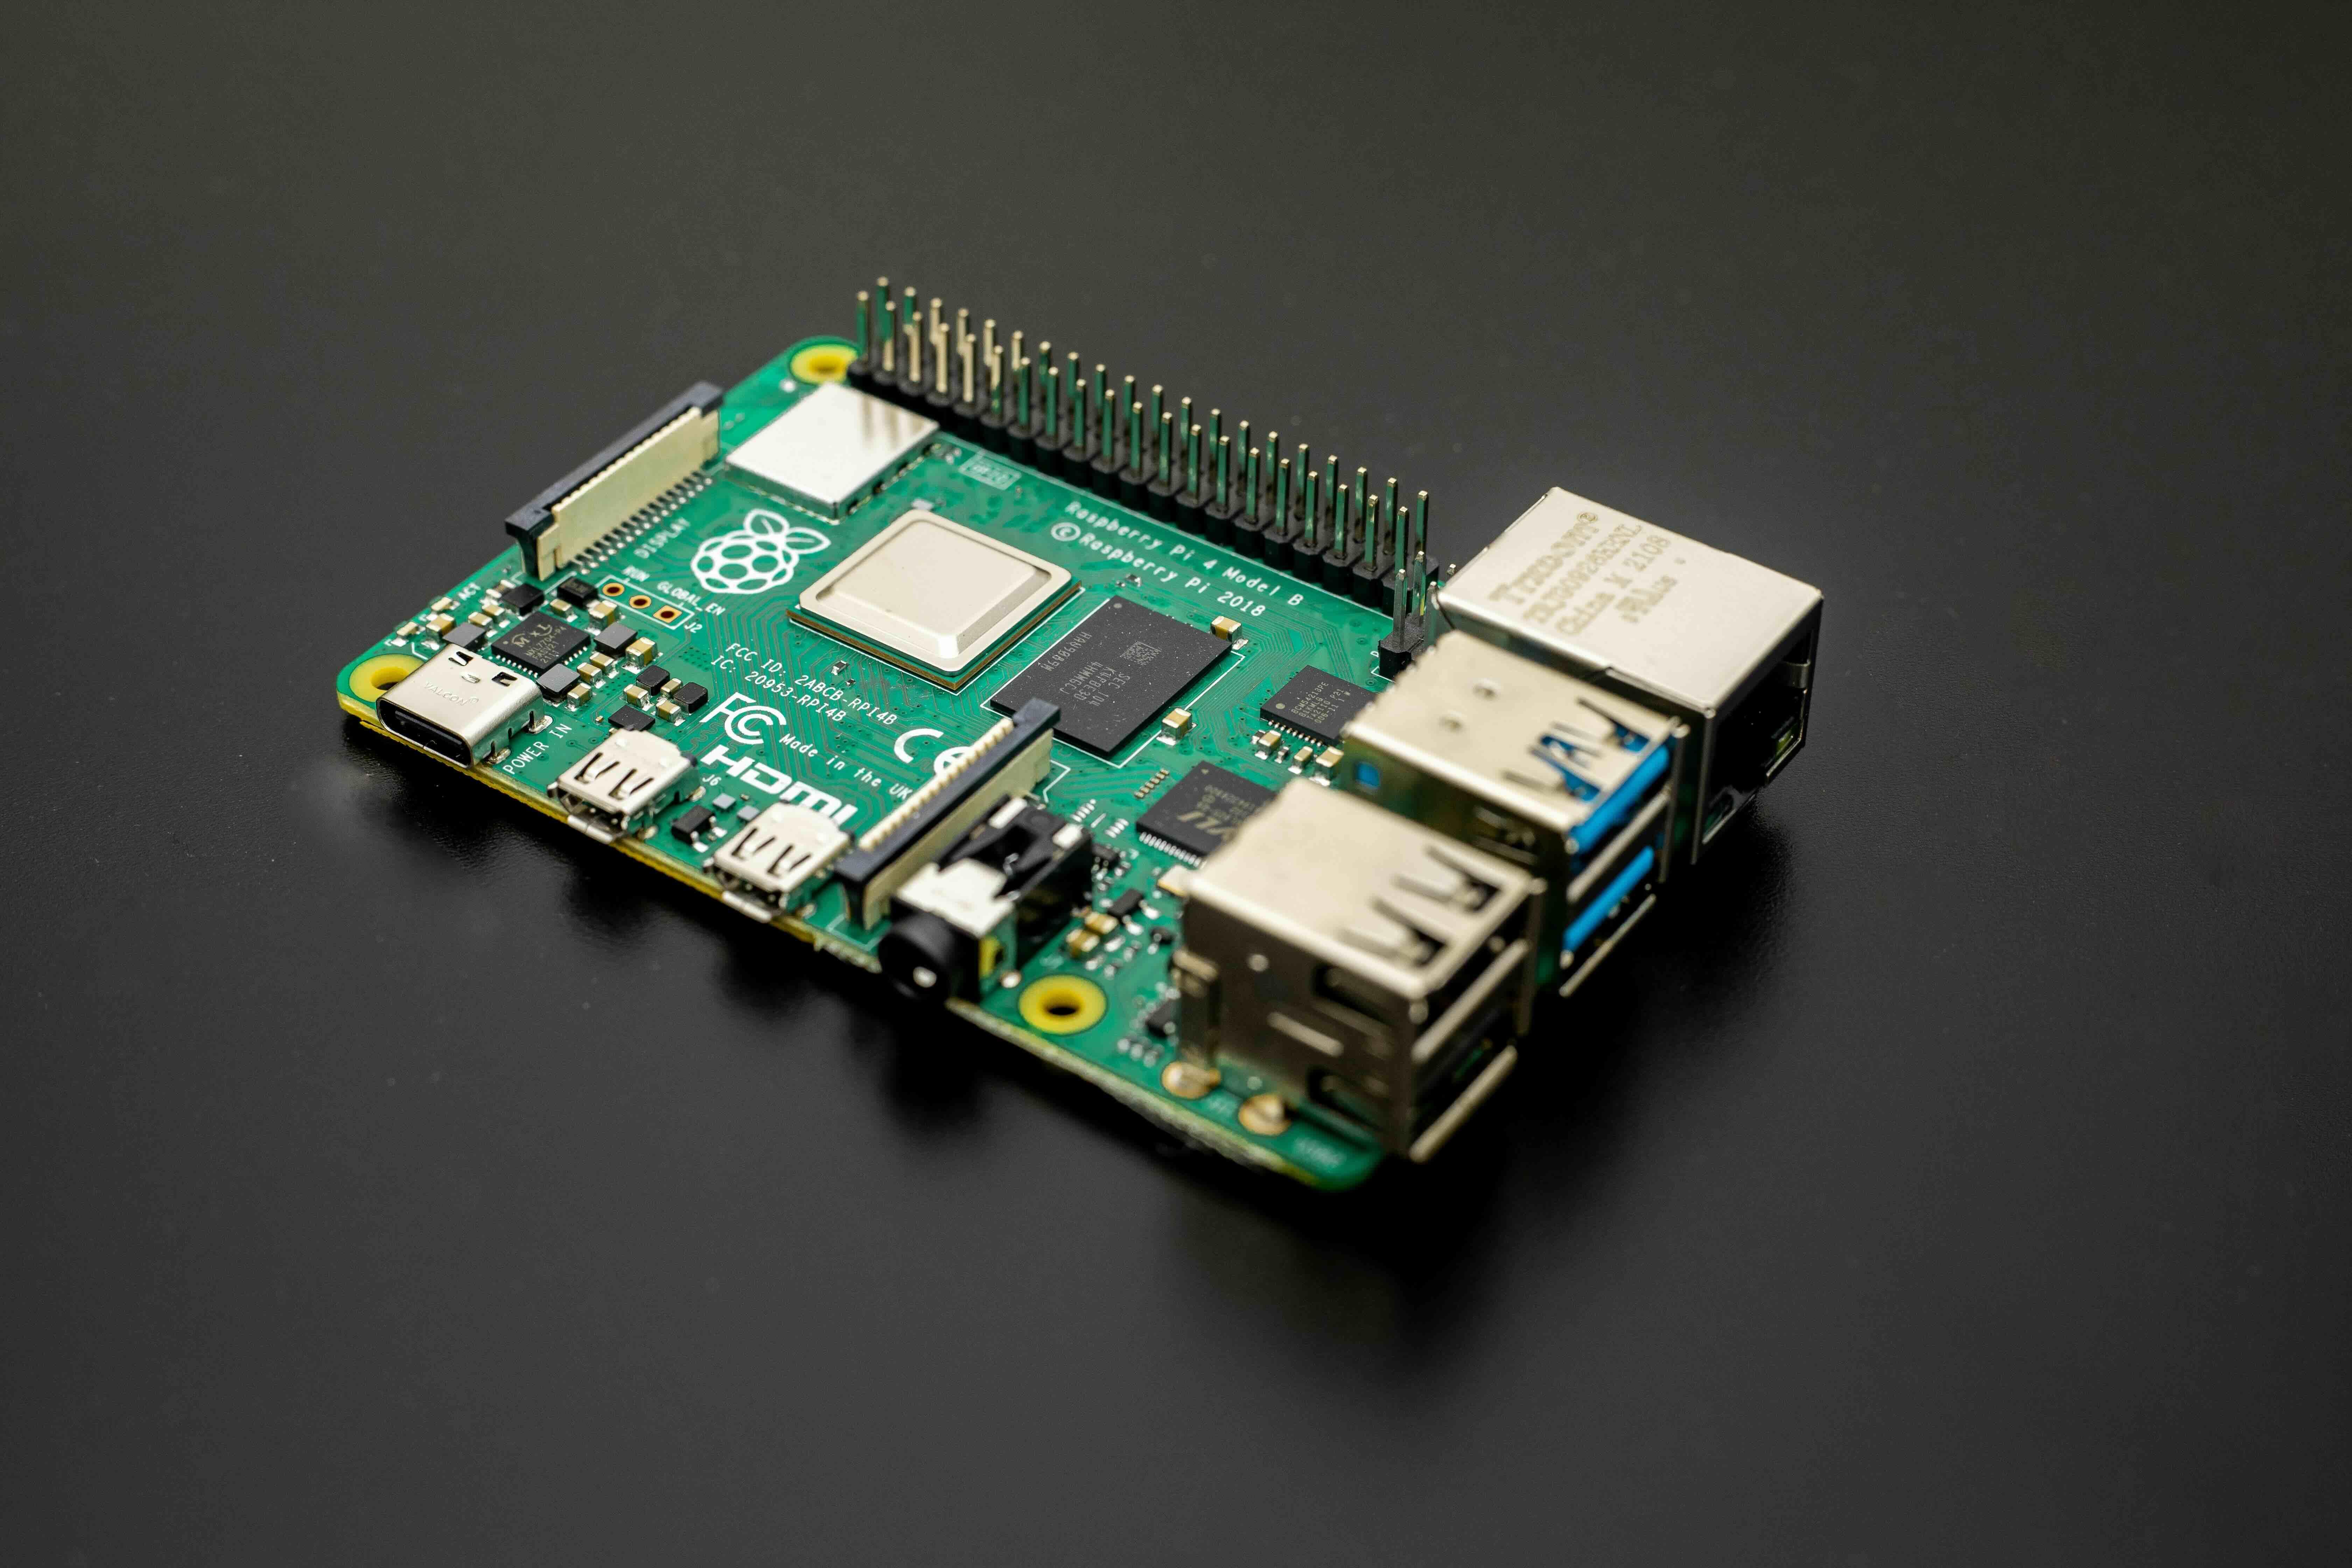
A Raspberry Pi is the most popular hardware platform for Homebridge: It consumes very little power in 24/7 operation (around 3 to 5 watts), runs completely silent, and keeps your accessories reachable around the clock.
Initial setup is completely headless, meaning you do not need a monitor, keyboard, or mouse. Everything is configured directly over your local network.
Why a Raspberry Pi?
Homebridge should run on a system that stays powered on continuously, without being disrupted by sleep modes or operating system updates on a work computer.
- Low power consumption: Under continuous operation, a Raspberry Pi draws between 3 and 5 watts. That amounts to very low annual electricity costs (roughly 10 to 15 EUR / USD).
- Silent and compact: In a passively cooled case, the board operates without fan noise and fits neatly right next to your router.
- Dedicated server: Your home automation runs independently of personal computers or laptops.
- Large community: Because the majority of Homebridge setups run on a Raspberry Pi, documented solutions exist for virtually every plugin and scenario.
Hardware and Accessories
Getting started requires only the board itself and a few solid accessories.
Model Selection
| Model | Recommendation | Practical Notes |
|---|---|---|
| Raspberry Pi 4 / 5 (2 GB to 8 GB) | Recommended | Plenty of computing power for dozens of plugins, Gigabit Ethernet, and sufficient headroom for camera streams or HomeKit Secure Video (especially with 4 GB or more). |
| Raspberry Pi 3 Model B+ | Suitable | Handles lighting, smart plugs, blinds, and sensors well. With multiple live camera streams or many data-heavy plugins, the CPU reaches its limits. |
| Raspberry Pi Zero 2 W | Conditionally suitable | Very compact and energy efficient. Fine for small setups with a few accessories. Lacks an Ethernet port and shares 512 MB of RAM. |
| Raspberry Pi 1 / 2 / Zero (1st Gen) | Not recommended | Outdated 32-bit ARM architecture (ARMv6/ARMv7). Modern Node.js releases and many current plugins are no longer supported. |
Recommended Accessories
- MicroSD Card or SSD:
- MicroSD Card: At least 32 GB with an A1 or A2 rating (Application Performance Class, such as SanDisk Extreme or Samsung EVO Plus). These cards are built to handle random read and write cycles more reliably.
- USB SSD (Pi 4 & Pi 5): You can flash the image directly to an external USB SSD using the Raspberry Pi Imager. On the Pi 4, connect it to one of the blue USB 3.0 ports. Ensure adequate power delivery, as power-hungry SATA adapters can strain the USB bus.
- NVMe M.2 SSD (Pi 5): A PCIe HAT lets you run an NVMe SSD directly on the Pi 5. To boot directly from NVMe, ensure the boot order is configured accordingly in the bootloader (EEPROM).
- Power Supply:
- Raspberry Pi 4: Official Raspberry Pi 15.3W USB-C power supply (5.1V / 3.0A).
- Raspberry Pi 5: Official Raspberry Pi 27W USB-C PD power supply (5.1V / 5.0A). The Pi 5 requires the 27W supply to deliver full performance and supply adequate power to connected USB devices without throttling ports.
- Generic phone chargers often experience voltage drops during peak loads, which can lead to filesystem errors on your storage medium.
- Passively Cooled Case: An aluminum case (such as Flirc) acts as a large heatsink and dissipates heat silently without moving parts or fan noise.
- Ethernet Cable (Patch Cable): A hardwired LAN connection to your router provides the most reliable connection for smart home bridges. Wi-Fi is also supported.
- Card Reader: To flash the storage card from your computer.
Installation Methods
Two main paths are available for installation:
- Official Homebridge Image (Recommended): A ready-to-use system based on Raspberry Pi OS Lite. Node.js, Homebridge, the web interface, and all background services come preconfigured. The server is ready to use immediately after the first boot.
- Manual Installation: If your Raspberry Pi already runs Raspberry Pi OS or Debian (for instance alongside Pi-hole or AdGuard Home), you can install Homebridge via the official APT repository.
Installing with the Official Image
The official image is the quickest and easiest way to get up and running.
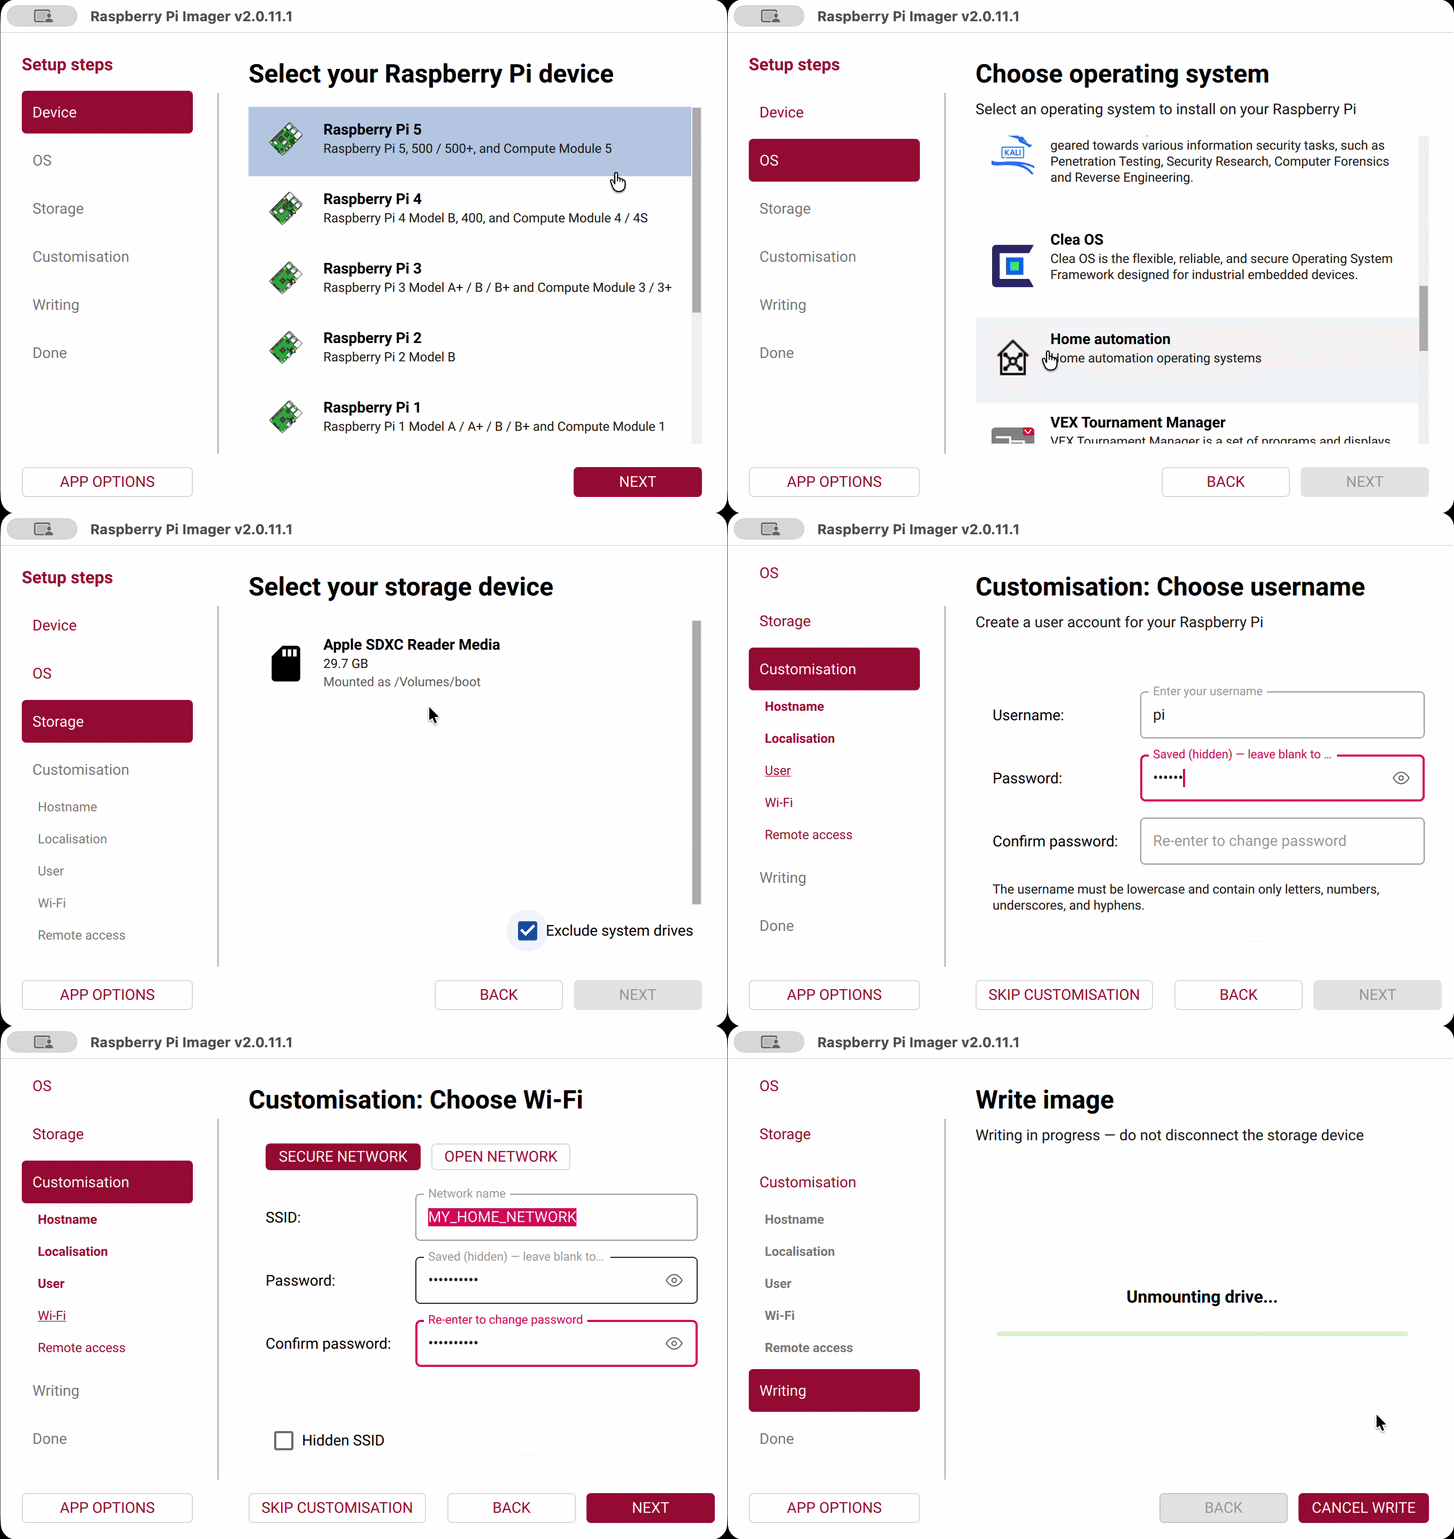
Download Raspberry Pi Imager
Install the official flashing utility for macOS, Windows, or Linux:
Select Image and Storage
Insert your MicroSD card (or connect your USB SSD) and launch the Imager:
- Choose Device: Select your Raspberry Pi model (for example, Raspberry Pi 4 or Raspberry Pi 5).
- Choose OS:
- Click Other specific-purpose OS.
- Select Home automation.
- Select Homebridge.
- Important: Choose the 64-bit version (
Homebridge Raspberry Pi OS Lite (64-bit)). It is optimized for Raspberry Pi 4, 5, 3, and Zero 2 W. Only use 32-bit on legacy hardware like the Pi 1 or 2.
- Choose Storage: Select your inserted card or SSD.
Configure OS Customization
When clicking Next, the Imager will ask whether you want to apply OS customization settings. Click Edit Settings:
- Hostname: Can remain
homebridge. You will later access the server securely viahttps://homebridge.localor on port 8581 (http://homebridge.local:8581). - User Account: Choose a username and password.
This account is your Linux system user for technical maintenance access (via SSH or the built-in terminal). It is not your Homebridge account, which you will create upon your first connection in the Homemanager app or web interface.
- Configure Wireless LAN: If you are not using an Ethernet cable, enter your Wi-Fi SSID, password, and country code (e.g.
US,GB, orDE). Specifying the correct country code is required for the system to legally enable 5 GHz Wi-Fi channels on the Pi 4 or 5. - Enable SSH (Strongly Recommended): Under the Services tab, check Enable SSH. Because the Pi runs headless, SSH is the primary way to access the system for maintenance or troubleshooting.
Flash and Power On
- Click Yes to write the image and verify the medium.
- Insert the storage medium into your Raspberry Pi.
- Connect the network cable (unless you preconfigured Wi-Fi in the Imager).
- Connect the power supply.
On the very first boot, the operating system automatically expands the filesystem across the entire storage volume and initializes background services. Wait about 2 to 3 minutes after powering on before attempting to connect via the Homemanager app or web interface.
Fallback: Wi-Fi Setup Without Preconfiguration
If you did not enter Wi-Fi credentials in the Imager and have no Ethernet cable connected, the system automatically starts a temporary Wi-Fi hotspot named Homebridge WiFi Setup after about one minute.
- Scan for available Wi-Fi networks on your phone or laptop and join
Homebridge WiFi Setup. - A captive portal page should open automatically. If it does not, open a browser and navigate to
http://10.99.0.1. - Select your home network from the list, enter your Wi-Fi password, and confirm.
- The Pi will connect to your router and shut down the setup hotspot automatically.
Connecting and Initial Setup
Once the Raspberry Pi has finished booting, Homebridge runs as a background service. The web interface (homebridge-config-ui-x) acts as the browser dashboard and provides the API that Homemanager connects to.
On the official Raspberry Pi image, HTTPS is active by default: connections use encrypted port 443 (https://homebridge.local), while port 8581 handles unencrypted traffic.
Because this is a fresh setup without existing accounts, you create an administrator account during the first connection. You can do this in the app or in a browser:
Setup with Homemanager
Homemanager lets you manage instances on iPhone and iPad, monitor live logs, and configure plugins.
Discover the server
Open Homemanager while connected to the same Wi-Fi network as the Pi. Tap Connect to Server during initial launch (or Add Platform in the platform list). The app scans the local network using mDNS and Bonjour.
Select the instance
Choose the detected server from the list. It shows the Homebridge icon and the address https://homebridge.local (port 443).
Create an administrator account
Homemanager detects the new server and opens the Create new User screen. Enter a display name, username (such as admin), and password, then tap Create and Log In.
The account is created directly on the server, credentials are saved securely in your iOS Keychain, and Homemanager connects immediately.
Discovery issues or separate VLANs? Refer to Connecting Servers to Homemanager for manual IP and port configuration and network troubleshooting.
Setup in the Web Browser
To configure the server from a computer, open the interface in a desktop browser.
Open the URL
Navigate to the address in your browser:
https://homebridge.localIf your router does not resolve .local domain names, use the Pi's IP address instead (such as https://192.168.1.50 or unencrypted http://192.168.1.50:8581).
Acknowledge the certificate warning
The image includes a self-signed SSL certificate. Browsers will show a warning stating the connection is not private. Click Advanced and proceed to the site.
Create an account or restore a backup
Enter a username and password for the admin account. If migrating from an earlier setup, you can restore a backup archive here instead.
After signing in, the dashboard displays the HomeKit pairing code.
Manual Installation on an Existing System
If your Raspberry Pi already runs an active Raspberry Pi OS or Debian installation, you can set up the official repository in the terminal:
# 1. Add official Homebridge repository GPG key
curl -sSfL https://repo.homebridge.io/KEY.gpg | sudo gpg --dearmor | sudo tee /usr/share/keyrings/homebridge.gpg > /dev/null

# 2. Add Homebridge repository
echo "deb [signed-by=/usr/share/keyrings/homebridge.gpg] https://repo.homebridge.io stable main" | sudo tee /etc/apt/sources.list.d/homebridge.list > /dev/null

# 3. Update package lists and install Homebridge
sudo apt update
sudo apt install -y homebridge
After installation, Homebridge is registered and started automatically as a systemd background service.
Useful Terminal Commands
The official image includes practical management utilities accessible via the hb-service command in an SSH session or the built-in terminal:
# Reset Homebridge password (restores login to admin/admin if forgotten)
sudo hb-service reset-admin

# Safely update Node.js to the recommended LTS release
sudo hb-service update-node

# Restart the Homebridge service
sudo hb-service restart

# View live system logs
sudo hb-service view-logs
For detailed guidance on maintaining Node.js, npm, and plugins, check our guide on Updating System Software.
Frequently Asked Questions & Troubleshooting
Next Steps
With your Homebridge server up and running, you can connect devices and plugins:
-
Pair with Apple Home: Both the web interface and Homemanager display your HomeKit setup QR code. Open the Apple Home app on your iPhone, tap the plus sign, select Add Accessory, and scan the code. Guide to Pairing with Apple Home
-
Install Plugins: Browse the plugin catalog in Homemanager or the web interface to connect accessories not natively supported by HomeKit (such as Tuya, Ring, Fritz!Box, Hue, or Shelly). Tips on Finding and Evaluating Plugins
-
Set Up Child Bridges: Isolate larger plugins into separate processes. If an individual plugin encounters an issue, the rest of your bridges continue operating without disruption. Learn more about Child Bridges
Further Resources
Guides in Homemanager Docs
- Choose Your System: Hardware Comparison
- Updating System Software & Node.js
- Startup Errors & Log Analysis
Official Homebridge Resources
- Official Homebridge Raspbian Image Wiki: Complete documentation for the image project
- Connecting via SSH: Step-by-step terminal access guide
- Resetting Wi-Fi: Official documentation on the fallback setup hotspot
- Supported Raspberry Pi Models: Detailed hardware specifications
Choose Your System
Which server is best for Homebridge? Compare Raspberry Pi, Synology NAS, Docker, mini PCs, Mac, and Windows on power consumption and performance.
Synology NAS
Step-by-step guide to installing Homebridge on Synology DiskStations: Native SPK package for DSM 7 or Container Manager (Docker) for Plus-series models.